Jakarta Faces 4 (JSF) with Simple Microservice as Backend DataAccess Example
This example demonstrates the usage of the j-framework in creating a project that communicates with a Simple microservice backend.
Prerequisites:
-
You should have JDK 17+ Installed. (Click Here).
-
You should have a simple microservice running first. (Click Here).
-
You should create a Maven Project.
-
You should enable snapshot versions. (Click Here).
Project Content:
This section contains what you should add to your code structure for this example.
-
Maven Project with pom.xml that has the following contents:
<project xmlns="http://maven.apache.org/POM/4.0.0"
	xmlns:xsi="http://www.w3.org/2001/XMLSchema-instance"
	xsi:schemaLocation="http://maven.apache.org/POM/4.0.0 https://maven.apache.org/xsd/maven-4.0.0.xsd">
	<modelVersion>4.0.0</modelVersion>
	<parent>
		<groupId>com.jalalkiswani</groupId>
		<artifactId>j-app-web</artifactId>
		<version>7.0.2</version>
	</parent>
	<artifactId>j-framework-web-microservice-example</artifactId>
	<packaging>war</packaging>
</project>-
Service configurations file located at
src/main/resources/config.propertiesthat has the following content:
services.example.url=http://localhost:8080/app/example-
Java Person class is located at
src/main/java/com/app/person/Person.javathat has the following content:
package com.app.person;

public class Person {

	private String name;

	private Integer age;

	public String getName() {
		return name;
	}

	public void setName(String name) {
		this.name = name;
	}

	public Integer getAge() {
		return age;
	}

	public void setAge(Integer age) {
		this.age = age;
	}

}-
Faces Controller located at
src/main/java/com/app/person/Controller.javawhich contains the following:
package com.app.person;

import jakarta.faces.view.ViewScoped;
import jakarta.inject.Named;

import com.jk.web.faces.controllers.JKWebController;

@Named("controller")
@ViewScoped
public class Controller extends JKWebController{
	private ServiceClient client = new ServiceClient();
	private Person model;

	public String sayHello() {
		String msg=client.callSayHello();
		success(msg);
		return null;
	}

	public String sayHelloWithName() {
		String msg=client.callSayHelloWithName(getModel().getName());
		success(msg);
		return null;
	}

	public String sayHelloWithObject() {
		String msg=client.callSayHelloWithObject(getModel());
		success(msg);
		return null;
	}

	public Person getModel() {
		if (model == null) {
			model = new Person();
		}
		return model;
	}

	public void setModel(Person model) {
		this.model = model;
	}

}-
Faces View located at
src/main/webapp/index.xhtmlwhich contains the following:
<!DOCTYPE html PUBLIC "-//W3C//DTD XHTML 1.0 Transitional//EN"
    "http://www.w3.org/TR/xhtml1/DTD/xhtml1-transitional.dtd">
<html xmlns="http://www.w3.org/1999/xhtml" xmlns:ui="http://xmlns.jcp.org/jsf/facelets" xmlns:h="http://xmlns.jcp.org/jsf/html"
	xmlns:f="http://xmlns.jcp.org/jsf/core" xmlns:p="http://primefaces.org/ui">
<h:head>
</h:head>
<h:body>
	<h:form>
		<p:autoUpdate />
		<p:growl />
		<p:panelGrid columns="2" style="margin:auto">
			<f:facet name="header">
				<h:outputText value="j-framework-Web Demo" />
			</f:facet>
			<p:outputLabel value="Your Name" />
			<p:inputText value="#{controller.model.name}" required="true" id="personName"/>
			<p:outputLabel value="Your Age" />
			<p:inputText value="#{controller.model.age}" required="true"/>
			<f:facet name="footer">
				<div align="center">
					<p:commandButton value="Say Hello" action="#{controller.sayHello()}" process="@this"/>
					<p:commandButton value="Say Hello with Name" action="#{controller.sayHelloWithName()}" process="@this,personName"/>
					<p:commandButton value="Say Hello with Object" action="#{controller.sayHelloWithObject()}" process="@form"/>
				</div>
			</f:facet>
		</p:panelGrid>
	</h:form>
</h:body>
</html>-
Service Client class is located at
src/main/java/com/app/person/ServiceClient.javawhich contains the following:
package com.app.person;

import com.jk.core.config.JKConfig;
import com.jk.services.client.JKServiceClient;

public class ServiceClient extends JKServiceClient<Person> {
	@Override
	public String getBase() {
		return JKConfig.getDefaultInstance().getProperty("services.example.url");
	}

	public String callSayHello() {
		return callJsonAsString("/hello");
	}

	public String callSayHelloWithName(String name) {
		return callJsonAsString("/hello/"+name);
	}

	public String callSayHelloWithObject(Person p) {
		return callJsonWithPost("/hello", p);
	}

}-
Main java class located at
src/main/java/com/app/App.javawhich contains the following:
package com.app;

import com.jk.web.embedded.JKWebApplication;

public class App {
	public static void main(String[] args) {
		JKWebApplication.run(8181);
	}
}|
Alternatively, you can clone or download the tutorial repository then import the project into your IDE. |
How to run Project:
-
Set up the project with the content shown above.
-
Inside your IDE, go to the
src/main/java/com/app/App.javaclass.

-
Next, run it as a Java Application.

-
Your program will start running and will open your browser to show you the result of the run. Alternatively, after running the code, you can open any browser to localhost on port 8181, and it will show you the run output as well.

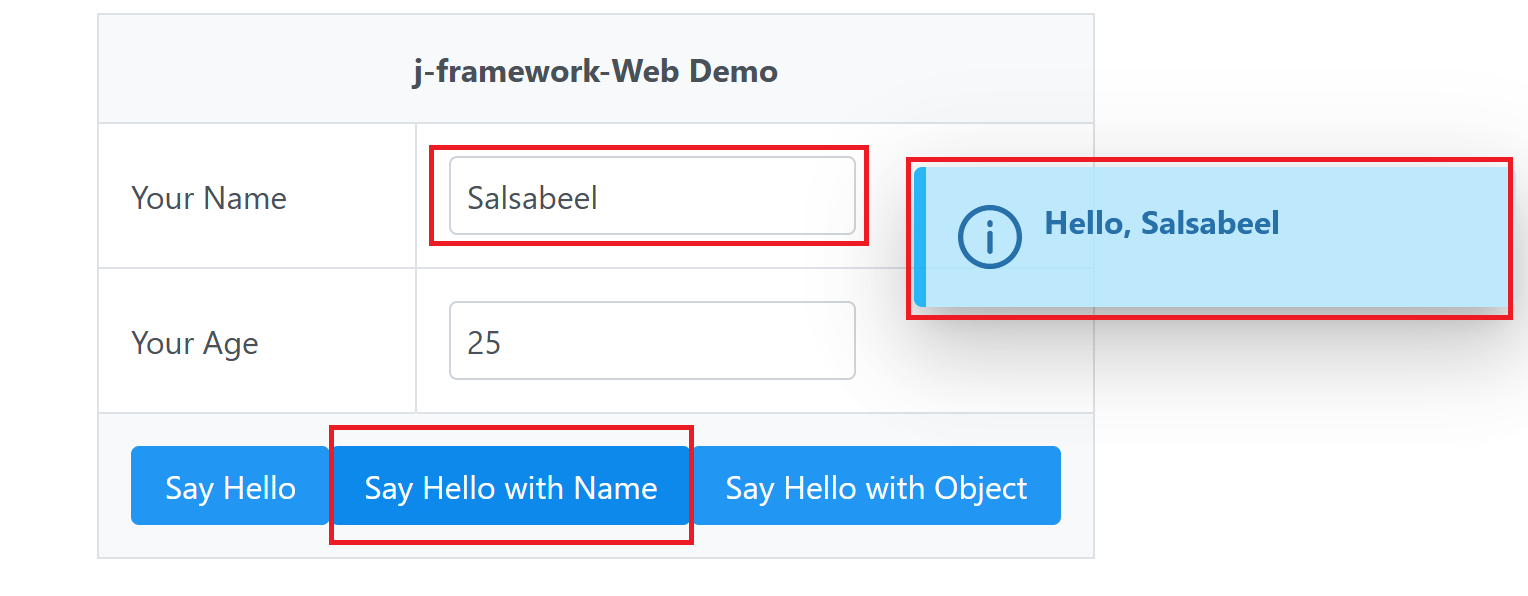
Example Explanation
-
The first page prompts you to fill in the form fields and has three main buttons under it.
-
The [Say Hello] button will show you a greeting from the microservice server.

-
The [Say Hello with Name] button will show you a customized greeting using the name you input in the form.
-
Finally, the [Say Hello with Object] button will create an object with the information provided in the form, and then retrieve the object attributes to give you a customized greeting message.
