Simple Microservice Client Using J-Framework
This example demonstrates the usage of the j-framework in creating a simple microservice client.
Prerequisites:
-
You should have JDK 17+ Installed. (Click Here).
-
You should have a simple microservice running. (Click Here)
-
You should create a Maven Project.
-
You should enable snapshot versions. (Click Here).
Project Content:
This section contains what you should add to your code structure for this example.
-
Maven Project with pom.xml that has the following contents:
<project xmlns="http://maven.apache.org/POM/4.0.0"
	xmlns:xsi="http://www.w3.org/2001/XMLSchema-instance"
	xsi:schemaLocation="http://maven.apache.org/POM/4.0.0 https://maven.apache.org/xsd/maven-4.0.0.xsd">
	<modelVersion>4.0.0</modelVersion>
	<parent>
		<groupId>com.jalalkiswani</groupId>
		<artifactId>j-app-web</artifactId>
		<version>7.0.2</version>
	</parent>
	<artifactId>j-framework-microservice-client-example</artifactId>
</project>-
Java Person class is located at
src/main/java/com/app/Person.javathat has the following content:
package com.app;

public class Person {

	private String name;

	private int age;

	public String getName() {
		return name;
	}

	public void setName(String name) {
		this.name = name;
	}

	public int getAge() {
		return age;
	}

	public void setAge(int age) {
		this.age = age;
	}

}-
Server URL Configuration file located at
src/main/resources/config.propertieswhich contains the following:
services.example.url=http://localhost:8080/app/example-
Main java class located at
src/main/java/com/app/App.javawhich contains the following:
package com.app;

import com.jk.core.util.JK;
import com.jk.services.client.JKServiceClient;

public class App {
	public static void main(String[] args) {
		String url = "http://localhost:8080/app/example";
		JKServiceClient<Person> client = new JKServiceClient<>(url, Person.class);

		String response = client.callJsonAsString("/hello");
		JK.print(response);

		String response2 = client.callJsonAsString("/hello/Jalal");
		JK.print(response2);

		Person p = new Person();
		p.setName("Jalal");
		p.setAge(40);

		String response3 = client.callJsonWithPost("/hello", p);
		JK.print(response3);

		String response4 = client.callJsonWithPatch("/hello", p);
		JK.print(response4);
	}
}|
Alternatively, you can clone or download the tutorial repository then import the project into your IDE. |
How to run Project:
-
Set up the project with the content shown above.
-
Inside your IDE, go to the
src/main/java/com/app/App.javaclass.

-
Next, run it as a Java Application.
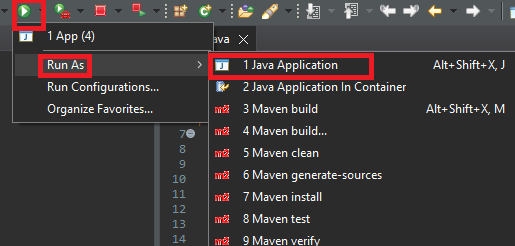
-
Your program will start running and show you the result of the run in the console.

Example Explanation
-
The first output line the client receives is the result from the server sending their default greetings.
-
The second output line is a custom greeting message that contains the client’s name in it.
-
The final line of the output is a custom greeting message that contains both the client’s name and their age retrieved from the Person object’s attributes which represent the client.
-
Check the main method to see how the client and server communicated to produce this output.