Last Updated: October 20, 2022
How to Create JUnit Test
In this tutorial, we will show you how Create and use JUnit Test.
JUnit is an open-source framework for unit testing Java programs.
This framework is used by developers to create and run automated tests. Every time new code is added, certain test cases in Java need to be run again. To make sure that the code is not broken, this is done.
Steps:
- 1.Create class with add method.
-
-
Create a package
-
Create a class.
-
Create a sum method in the class, as shown in the figure below.
-
This method will take two parameters and return the value of the summation of two numbers.
| You can copy the code below and paste it into your project and it will auto-create a class for you. |
Unresolved include directive in modules/tutorials-external/pages/junit-testing-tutorial.adoc - include::inc/junit-testing/App.java[]
- 2.Create new JUnit Test Case.
-
Now we need to create the class test case that we will use in our project.
-
Right-click on the Project.
-
Select new.
-
Select Junit Test Case.
-
| We are Using JUnit 4 in our tutorial. |

-
Enter the package name.
-
Enter class name.
Now let us create our test Methods like the figure below.

Unresolved include directive in modules/tutorials-external/pages/junit-testing-tutorial.adoc - include::inc/junit-testing/AppTest.java[]In the Method "testSum" we used "assertEquals", which will we use to compare the expected result with the actual result.

- 3.Run the Junit Test.
-
-
Right-Click on the project.
-
Select Run As.
-
Select JUnit Test.
-

Our Test runs successfully as shown in the figure above with no errors.
As you can see it shows us the time take to run the method, in which class, how many time it runs, and the number of errors and failures.
Let us try adding a new test Method with the wrong data.
@Test
	public void testAddWrongNumbers() {
		assertEquals(20, app.sum(5, 5));
	}

Repeat the last step Run as JUnit Test again.
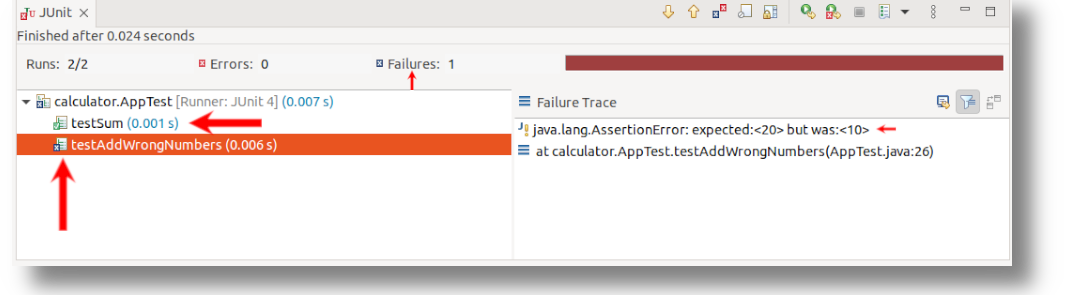
Here we got a failure because our expected result is 20 and the actual result is 10, So our test Method is working and can detect failure.
Advanced JUnit example with Exception Handling
If the code you runs throws an exception it will automatically fail your unit test, so we use assertThrows method.
| If the code did not return an exception, the error "Expected exception" shows up. |
Steps:
- 1.Create class with add method.
-
Ok, let’s start with creating the method in our class, like in step 1 in the previous example.
Our method returns the age group ("Infants","Child","Teen","Adult") when we pass the age.
Unresolved include directive in modules/tutorials-external/pages/junit-testing-tutorial.adoc - include::inc/junit-testing/AdvancedApp.java[]- 2.Create new JUnit Test Case.
-
We create a new JUnit Test Case as step 2 in the previous example.
Unresolved include directive in modules/tutorials-external/pages/junit-testing-tutorial.adoc - include::inc/junit-testing/AdvancedAppTest.java[]| We added (expected = IllegalArgumentException.class) after test annotation ("@Test"), because we know the method will return an exception, if you remove it, we get "IllegalArgumentException :invalid input" when we run the JUnit test. |

- 3.Run the Junit Test.
-
We Run the Junit test as in step 3 in the previous example.

As you can see we did not got any exception because in our test method we predicted the exception.
That’s how we handle the exceptions with JUnit.
JUnit Test Order
By default, JUnit runs tests in an unpredictable order.
In most cases, this behavior is perfectly fine and acceptable. But there are cases when we need to force a specific order, so we can Use Order by name ascending.
Steps:
- 1.Add the @FixMethodOrder annotation before the class.
@FixMethodOrder(MethodSorters.NAME_ASCENDING)
- 2.Add alphabetical order to the methods.
-
NOTE: We are using Advanced JUnit example with Exception Handling for this example.
If you run the JUnit test repeatedly the methods will be executed randomly, as shown in the figure below.
So let’s add ("A","B","C",etc.) to the start of the method as shown in the code below.
Unresolved include directive in modules/tutorials-external/pages/junit-testing-tutorial.adoc - include::inc/junit-testing/AdvancedAppTestOrder.java[]- 3.Run the JUnit test again.
-
As you see in the figure below, no matter how many time you run the test, the excute order always will be the same.

That’s how we run the JUnit test in order.